 Since in modern conditions it is rarely possible to find heating in the bathroom, you have to install a dryer yourself or ask plumbers. However, in any case, you need to know the correct installation procedure for personal safety and reliability certification.
What you need to know to connect a heated towel rail to a hot water riser
First you need to study all the possible varieties of design. There are only four main ones:
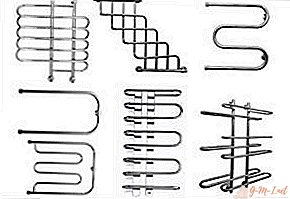 The snake. It is a classic model that behaves quite simply during installation and is not a problem.
- Ladder. Unlike the previous one, he considers it a more modern option. It is used for a different nature of connection. But not all conditions are suitable.
- P- or U-shaped. Standard and normal view. It is in great demand due to its high availability.
- Complex form. It can perform not only the heating function, but also act as a decor to create the interior of the bath. However, everything will be so good if the connection is carried out correctly. Otherwise, circulation may not be ensured.
 The snake. It is a classic model that behaves quite simply during installation and is not a problem.
IMPORTANT! In addition, it is better to buy a design from a domestic seller-manufacturer, and to comply with GOST standards. It is also impossible to use parts from different materials, and for different pipe diameters, adapters must be used. Do not forget about the decrease in power by about 10% if the pipes are connected from below to the system.
Possible options for connecting a heated towel rail to heating
Of course, the introduction is of various types. In the article, each of them is considered separately.
Bottom connection
It is believed to have less effective action. But still a standard and universal option that will be permanently used in any direction of flow in the riser. The principle of operation is very simple - hot water enters from one side, and leaves from the other. To ensure that performance does not underestimate optimal performance, it should:

- Install Maevsky cranes so that they are on the upper terminals. This is necessary for the release of air, which usually accumulates in the upper part.
- Observe the direction of the supply pipes (proportions of approximately 4 mm per meter).
- Bypass acquire narrower and direct. And make sure that nothing blocks it, otherwise it will slow down the circulation and worsen the pressure of the water.
- The room in which the device is located is best kept in isolation.
Bottom connection with top water supply

Despite the fact that the feed takes place from above, the drain of the riser should still be located below the upper boundary of the heated towel rail. Because in other cases it will not turn on at all. However, if you remember the condition that the connection should be above the outlet, the unit will need to be lifted up, so to speak, to the ceiling.
REFERENCE! It is forbidden to create a "hump" or "loop" on the eyeliner from above. Because of this, the circulation will definitely cease to act.
Side connection
 The good thing is that all three standard forms can participate in use. And if you take the "ladder", then you just need to put the plugs and no water drains are needed. With this method, a narrowed bypass is required. The taps, in turn, should be definitely in a horizontal line. The operation of the device will occur if they are from the upper feed. If all recommendations are followed, then stability is guaranteed. There is also a valid but undesirable scheme that would require Maevsky cranes. In this case, air vents are below the edge of the dryer, so the user periodically remove the air mass in the process.
Diagonal connection
 In principle, the efficiency is no different from the previous version, however, you need to spend more on consumables, since the pipes themselves are overall. Water comes from one upper side, and diverted from the bottom diagonally. Moreover, the bypass must be not narrowed and unbiased. In this design, the feeder operates with the farthest, while the last of them is connected to the neighbor. It is worth remembering that the chances are less than all the others for a successful launch, because the resistance of the substation increases.
Is the shape important
The type of device connection will depend on this characteristic, therefore it is customary to consider a more or less important aspect.
How to connect a ladder heated towel rail
ATTENTION! This can only be done if the system is turned off. Therefore, for starters, you should contact the Housing Office with a request to turn off the riser. You will be assigned a wizard arrival date. And then you can start the process.
Develop a plan, materials that are useful to you. Read the instructions that write an individual approach. In spite of this, there is a general phasing.
- Reproducing the dismantling of a real dryer.
- Connection of pipes and equipment.
- Installation of cranes.
- Jumper mounting.

At the end of the work, remove all accumulated debris and check the capabilities of the updated device.
REFERENCE! During installation, it is advisable to adhere to a certain distance between the surface and the pipes. For example, it can be 3.5 meters if the diameter is less than 25 centimeters.
How to connect a “snake” heated towel rail to a hot water system
 It is best to establish a universal side connection. However, you will have to use a grinder for dismantling. Preliminarily carry out the same fraud as usual - disconnect from the network and drain the water from the riser. It is advisable to start the installation itself with the installation of a bypass. With one valve, block the movement of liquid, and with the help of the other two fix the place of attachment of the unit. After a step-by-step instruction, which is attached with the design, you can open the pressure head, taps.
Connection diagram for heated towel rail

In this situation, you will have to consider some features. The operating pressure is 8 atm; however, it can experience up to 16 atm. For improved heating, there is a Mayevsky crane, then the air will exit the system. Installation takes place thanks to special bushings. They are mounted on the wall. When pushing the legs onto the bushings, screws are used to secure the device for sure.
The main connection errors, and how to avoid them
 No one is safe from mistakes, this is normal. However, to reduce their number, consider the following recommendations:
- Due to improper positioning, air locks may form. To prevent this, the dryer should be placed horizontally.
- Most often there is a risk of leakage, to avoid this, replace the old one with a new product.
- Nevertheless, if you do not have special knowledge and skills, consult a specialist so that you should not try your luck in vain.
Now you can easily connect your own heated towel rail yourself.
Leave Your Comment