For lovers of fishing at any time of the year it is worthwhile to purchase a special device that would provide maximum convenience in the classroom. What this feeder chair itself represents, how to build it yourself and which ones you especially need to know will be discussed in this article.

What kind of feeder chair is it?
The presented design should have the following list of qualities. It includes:
- Compactness. This property is needed to make it easier for the user to carry the unit in a bag or backpack.
- Sustainability. In the winter season, it should be remembered that it is difficult to resist on the ice itself, which means that you need to approach this issue as carefully as possible.
- In addition, even on an uneven surface, the device must be mounted as securely as possible.
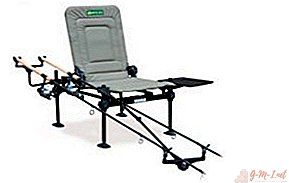
 As for the appearance, it is the possibility of folding the back. At the same time, the load of the lumbar region of a person is significantly reduced, which indicates safety and comfort with a long stay in one position.It is also worth noting that all the necessary elements for fishing are right under the arm of the angler. This eliminates the need to periodically get up and does not allow distractions from the process itself. Thus, the arrangement of a person who is engaged in a passive business is the most practical. When using the design, the body is not subjected to stress, which allows for a long stay of a person in one position.
DIY feeder chair - a simple option
For those people who can not afford a fairly expensive device, there is a way out. It consists in the fact that without much effort and time-consuming actions, you can independently construct such a structure for yourself. To do this, you just need to purchase the necessary materials, tools and take some time. For full-fledged creation, you should adhere to the following algorithm in the specified sequence:
 To begin with, it is advisable to arm yourself with such items: bolts, staples 6 mm, a steel plate 3 mm, one fabric with parameters 800 by 400 and one from 700 by 400 mm, except for this pipe (diameter 25 mm) and of which there is a thread (4 pieces of 55 cm, two 70 cm, one 30 cm). To process the frame, a fabric product is required.
- After all the necessary products are at hand on readiness, you can proceed with further actions. First you need to indicate the desired dimensions of the structure. Next, make a drawing for them. It is useful for orientation in the process.
- Then it is worth taking two circuits prepared from pipes and connecting them so that the position is crosswise. Fixation can be given either by a bolt or a nut.
- Next, sew on top of any coarse fabric strips.
- On the bottom side, a limiter should also be made from a similar product.
- To perform the function of the back, it is worth attaching another tissue segment.
 To begin with, it is advisable to arm yourself with such items: bolts, staples 6 mm, a steel plate 3 mm, one fabric with parameters 800 by 400 and one from 700 by 400 mm, except for this pipe (diameter 25 mm) and of which there is a thread (4 pieces of 55 cm, two 70 cm, one 30 cm). To process the frame, a fabric product is required.
Additional devices
Thanks to modern technologies, it is possible to equip your building with auxiliary elements that will improve interaction with the unit. Therefore, with independent mastery, this fact should be taken into account.
- A common component most often is attachments. With it, you can place the necessary parts right at your fingertips. Such a special stand allows you to fit various packages, jars next to you. Therefore, you do not have to reach for them to the ground. In addition, in the compartment you can fix the rod in a position in which it will be convenient for you.
- The next device is the capture for large fish.
- Also, do not forget about the sieve for scooping.

Leave Your Comment