Each caring parent seeks maximum care for his child. It can manifest itself in different areas. So, competent construction of a comfortable bed with your own hands is one of the indicators of this manifestation. But in order to achieve truly successful results, you should study all the material that relates to the manufacture of children's designs. This will be discussed in the article.

Putting the crib together
First you need to arm yourself with tools and materials, without which you can not do in the process:
 Pendulums.
- Legs.
- Frames.
- Longitudinal and transverse bars.
- Handsets.
- Hex wrench.
- Base shield.
- Screwdriver
- Side planks.
- Connection node.
- Sealing the cord.
 Pendulums.
Assembly diagram
 After all the components are available, you can begin to create a preliminary system. It is necessary to establish the exact parameters by which you will be guided in the future. For example, the frame of the box can be a chipboard size of 1200 * 450 millimeters. The upper and lower trims can be purchased with parameters 20 * 35 * 1185 mm. Speaking of general dimensions, it is advisable to adhere to 1740 * 680 * 1075, where the length, width and height, respectively. For compactness, you can use additional elements. After determining the drawing, it is worth preparing the workplace: lay a paper sheet on the surface to provide protection against possible damage.
Step-by-step instruction
Adhering to the algorithm described below, you will definitely provide yourself with a reliable device for long time.
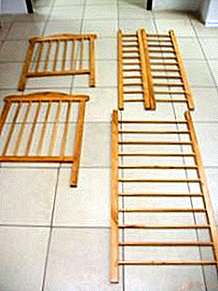
How to assemble a crib - housing
First you need to attach the sides to the back wall. After that, using the Allen key, tighten the confirmations that are located on both sides of the unit. They pull together all the available products. When the appearance of the structure is formed, you can proceed to the lower section. To do this, it is worth installing the bottom of the crib.
 As for height, this is a personal size based on your drawing. If you have not decided yet, then thanks to the specially designed holes, you can adjust the hill. The base itself is a rack structure. Its fastening occurs due to the lateral parts of the bed and is inserted through them into the frame. At this stage of the process, it is best to use screws - they will securely fasten the elements. Those confirmations that were not screwed should be installed in the back wall. To attach the front face, it is worth unscrewing the screws that are on the rack foundation. Then you can insert the product and secure with the side. To fix the resulting design, you need to insert the parts back. The next step will be the assembly of the lifting bar. The spring must be lowered and clamped with a button, which should first be put on it. Then insert into the recess of the strap.
REFERENCE! Do not forget that they are on both sides. Next, insert the studs into the front of the bar. It is important that it passes through the cylinder - this will give additional fixation. In the end, the lifting section should be placed on the top.
Putting the foundation together
If you have a box with a guide mechanism, then they must be attached to the sidewalls from the inside. They are also joined by longitudinal bars. To complete the collection of the building, it is necessary to complete the legs.
Mounting the swingarm
To secure the material, screws should be attached to the bearings. And to do from the side where the recess is large. This is necessary so that the heads are completely immersed in the hole. From the back, you should put the tube on the thread, and the screw, in turn, tighten not only on the base, but also on the legs of the entire structure. With the right result, you will get a calm movement of the mechanism. To ensure a stationary state, you need to insert a certain screw into the hole of the pendulum.

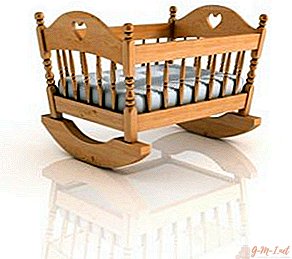
How to assemble a baby cradle
This will not be harder to do than the previous device. Just need the following materials:
 Boards with parameters of 28 millimeters.
- One plank with a thickness of 18 mm.
- The rods.
- Wood screws.
- Construction glue.
- Varnish for the material.
- Jigsaw.
- Milling machine.
- Drill.
- Brush for painting.
 Boards with parameters of 28 millimeters.
After collecting the necessary items, you can proceed to the main part. And as always, he makes a template along which further actions flow. Using a machine, cut out all the necessary details and construct the bottom of the structure. Fasten the longitudinal parts together. Then tighten all the details at the expense of the screws. Their recess should be no less than 1 cm. For strength, you can add glue. To protect yourself and your baby from sharp corners, they should be rounded. The last step will be fixing the structure with varnish.
Leave Your Comment