 Making repairs on the balcony, you can simultaneously engage in a rather interesting and not very difficult business. We are talking about a home-made locker, which will not only perform the function of storing various items, but also make up an additional interior, the so-called small separate room. Therefore, this article will provide guidance on the manufacture of the design, as well as several useful recommendations regarding the work process. it’s easy to decorate cabinets nicely; on the Internet you can find step-by-step photos.
DIY cabinet on the balcony - product options
There are many different options in what form the structure will be made. Consider each of them:
 Most often they use built-in modules. They are famous for their long service life, since the doors of the device close tightly, which does not give a chance for possible damage. In addition, it is convenient to evaluate the entire range when open. However, it should be remembered that you can not take a place in front of the building, otherwise it loses its meaning. Consequently, the entire area of the room is used irrationally.
- Freestanding. Using the mirrors that are mounted on them, you can visually increase the space. In addition, we can emphasize their profitability in the acquisition.
- Corner It helps a lot in setting up a balcony, which have a non-standard shape. They can easily mask a corner. In this case, you can not even use a special wall for equipment, since the wall of the room can serve. Therefore, the site is involved as functionally as possible.
- Do not forget about the designs with open shelves. This method is the most modern. In addition, there is the opportunity to easily create a design out of this.
 Most often they use built-in modules. They are famous for their long service life, since the doors of the device close tightly, which does not give a chance for possible damage. In addition, it is convenient to evaluate the entire range when open. However, it should be remembered that you can not take a place in front of the building, otherwise it loses its meaning. Consequently, the entire area of the room is used irrationally.
What can I make a wardrobe on the balcony
In general, the work on creating the project is quite diverse. In each aspect, there are options for the outcome of events. Material for the manufacture is no exception. To make a choice, it is advisable to consider the advantages and disadvantages:
Tree
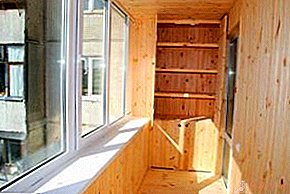
In the process of fixing to the wall, you can understand that the structure is as strong as possible and can withstand even the largest load. Creates a natural effect in the design of the room. However, considerable user time is required for maintenance. In addition, direct sunlight that falls on the product will contribute to the timely dimming of the wooden surface. Also, most likely, deformation of the bars of the frame due to insufficient dryness will occur. Since the material is sensitive to a humid atmosphere.
Chipboard
It is characterized as the most budgetary acquisition of all its competitors. Unlike the previous material, this one is the most resistant both to humidity and to a sharp change in temperature. A sufficiently large palette of colors, so everyone can choose the shade of the structure for their future full-fledged interior.
Drywall
 It differs in that the user does not have various difficulties in assembling the structure, as well as in its establishment. In addition, it can be easily processed and painted by choosing the desired color scheme. If you use metal profiles, you can not worry about deformation. However, if we compare the accessories with wooden, the first of them will be inferior to the other in the fortress and in the structural load. To this can be added the smallest shock resistance. In any case, the flaws can be eliminated. For example, to strengthen and fix the device with any shelves, and provide its corners with greater impact resistance (plaster nets are perfect for this case).
Plastic
Perhaps the best choice to use. It not only resists all kinds of stressful situations and influences, but also the maintenance of this unit is as simple as possible and does not take a huge amount of time. It is only necessary to wipe with a damp cloth as it becomes dirty and the cabinet becomes as if it was just acquired. If a person who uses a cabinet has a desire to create swing doors from plastic or a compartment, then there are no obstacles to this.
Do-it-yourself wardrobe on the loggia
Of course, with great desire and readiness, there is the opportunity to make your own construction and be proud of your invention. This will take some time, however, you will get great pleasure from what is happening, and as a result you will get useful and necessary for each product.
Design selection and drawing creation
When of all the varieties you choose the right one for yourself and your loggia, you need to compose a sketch, according to which you will be guided throughout the work process. Model Options:
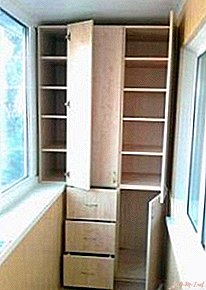
- A cabinet equipped with three compartments, which is preferably installed in wide rooms. Its upper part does not reach the ceiling, there is space there - it is recommended to use it under various flowers or any objects. As for the internal site, it is equipped at the expense of personal preferences.
- The construction is in the form of a compartment made of chipboard material. His doors are sliding, as they are the most comfortable. In appearance: compactness and accuracy.
- Good for narrow lengths. In the upper zone, it expands, thanks to even the widest window sill. One door is active, the other is deaf.
The drawing itself needs to be formed on the basis of the presented cabinet parameters, its own preferences. Therefore, each option is individual for each. In addition, you need to decide what will be stored in the unit. The number of built-in shelves will directly depend on this. Standard measurements (plus / min 100-200 mm): height - 2500, width - 1100, depth - 500, the gap between the shelves - 350.

What materials and tools are needed
ATTENTION! The number of blanks depends on the parameters.
You will need:
- Nails, dowels, screws - elements for fasteners.
- Chisel and hammer.
- Ruler, pencil.
- Drill and drill.
- Jigsaw.
- Grinding machine.
- For a frame made of wood, a beam is required, the cross section of which is 40 by 40. In its absence, it is better to take a galvanized profile of metal.
- If you decide to sheathe plywood or chipboard, then you need a moisture-proof panel. Its thickness should be approximately 10 to 12 millimeters.
Parts preparation
This stage consists of the procurement of elements from the bars, the dimensions of which must correspond with those prepared in the scheme. It is necessary to cut out the components of the lining (make a ratio with the necessary parameters). And prepare the fasteners that will be necessary for fixing to the casing body.
Assembly
 First you need to mark the location of the future cabinet. For accuracy, the construction level should be used.
- Independent fixing of the frame components on the ceiling and floor.
- Using vertical risers, connect the above parts.
- The intermediate crossbars must be fastened together by means of metal corners.
- Next, install the shelves at your discretion.
- The next step will be the door. Size, of course, is pre-assigned.
- Conclusion - casing.
 First you need to mark the location of the future cabinet. For accuracy, the construction level should be used.
REFERENCE! The use of a special level in the process is again strongly recommended. Secure with screws. Remember that the distance between them should be about 40 centimeters.
Door manufacture and installation
The product must comply not only in terms of parameters, but also in appearance. There is a variety of them:
- Sliding. They have maximum comfort when included in the design of the wardrobe. They have a fairly high cost.
- Swing. The standard and most affordable option. It is worth considering the distance in front of them, which must be free.
- Shutters. Very similar to blinds.
Interesting design ideas - we make a beautiful cabinet
The manufacturer’s imagination affects how the object will be presented in the end. It can be a balcony, in which a part is enclosed as a partition in the form of doors. Behind it can be any shelves or the same empty space where you can bring the whole bike. If you want to store perishable products, then you should think about the blinds.
Do not forget about the color scheme. Light colors should be chosen to visually emphasize the dimensions of the room. It can be either beige, white, or “wood-like”.

Leave Your Comment