 A vacuum cleaner is a universal thing that is available in almost every home. One of its components is a garbage bag, which requires constant replacement. Therefore, the question of its manufacture is very relevant with its own hand.
Making a bag for a do-it-yourself vacuum cleaner
For independent manufacture of a dust bag, special knowledge and skills are not needed. It is enough to follow the simple recommendations presented below. In addition, it is necessary to follow all stages of manufacturing in the desired sequence and prepare in advance all the required materials and tools.
Vacuum cleaners use bags for collecting various types of dust. There are disposable dust collectors. They are very convenient, because after use they immediately fall into the garbage container. Accordingly, they do not need to be washed and cleaned. Their main advantage is that the person in the process of using them does not come into contact with the garbage. That is, cleaning becomes more hygienic. Such devices are often used to collect small debris. The disadvantages include the fact that for each use of the vacuum cleaner you need to buy new bags, and this is very expensive.
The second type is reusable bags. The name speaks for itself. Such accessories are very durable and can be used many times. Thus, they do not need to spend a lot of money. They can be used for almost any type of garbage. Their significant disadvantage is that they require constant washing. Leaving them with garbage for a long time is not recommended, since this is not hygienic - they can serve as a source of the spread of pathogenic bacteria. Especially if the garbage collected was wet or water got there.
ATTENTION! Be sure to wear a protective mask when cleaning the garbage bag, as dust can easily enter the respiratory tract and cause harm to health.
Materials and Tools
In order to sew an accessory for collecting dust you will need:
- scissors;
- cardboard;
- threads
- stapler;
- glue, preferably a moment;
- fabric or paper.

It can be fabric for pillows (teak), non-woven fabric or velveteen. Some craftsmen even use nylon tights for these purposes. However, it is advisable to use a dense fabric, because it does not allow dust particles to pass through. Spunbond is great. This is a covering material that can be purchased at any hardware store or department. The fabric consumption is approximately one and a half meters. But it all depends on the dimensions of the filter that needs to be done.
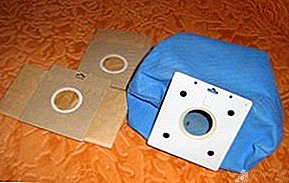
IMPORTANT! For the sample, it is better to use a clean original bag from the manufacturer, which was originally in a vacuum cleaner. This is a great example on which you can navigate in the process.
Stages of manufacturing a bag for a vacuum cleaner
A detailed description of the manufacturing process of a bag for a vacuum cleaner is as follows:

1. First of all, a pattern is prepared. The fabric is doubled or tripled (this is determined by its texture) and fixed using a stapler or thread. This is necessary so that the bag is stronger and even the smallest dust can not leak from the filter back into the room. You can take the old bag, as mentioned earlier, and measure its dimensions. You can simply circle it with a pen or pencil. If the original dust bag is not available, you must open the cover of the vacuum cleaner and measure the length and width for the location of the filter. It is also worth adding 1 cm to the hem.
2. The fabric folds in the shape of a bag. All sides of the bag are stapled together. For greater strength, the fabric can be sewn on a typewriter. It is advisable to sew Velcro or zipper on one of the sides - then the dust collector will be reusable. The product is turned inside out so that all brackets or seams remain inside.
3. Using a pair of scissors, a hole in the shape of a circle is made. Its diameter can be measured using a vacuum cleaner to fit the hose or use an old bag.
4. On two cardboard sheets, holes of the same size are outlined and cut out as before on the fabric with the addition of a few millimeters to fit the hose. Glue is applied to one of the sides of these cardboards. The bag is threaded into one of the cartons treated with the adhesive side up. The second sheet is applied to it with the processed side down. As a result, the round hole is clamped between the sheets of cardboard and is firmly connected with the adhesive composition. For greater strength, the edges of the cardboard are fastened with a stapler. Instead of cardboard, you can attach a plastic mount from the original bag.
ATTENTION! The cardboard used must be strong to withstand sharp debris.
In such a simple way, you can make a bag for a vacuum cleaner with your own hands. It remains only to place it in the appropriate compartment of the unit and begin cleaning the room.
Leave Your Comment